
The Secret to Stretchy Gluten-Free Pizza Dough: Finally, the Perfect Crust!
Let’s be honest for a second — making gluten-free pizza dough that’s actually stretchy feels a bit like chasing a unicorn. We’ve all been there, right? You mix the flour, add the water, and what you get is either too sticky to handle or breaks apart like wet sand.
But here’s the truth — with the right ingredients, ratios, and a few small but powerful techniques, we can create a gluten-free dough that stretches beautifully and bakes up into a crisp, chewy crust.
So, let’s roll up our sleeves and talk about how to make it happen — from the science behind the stretch, to a tried-and-tested recipe you can master at home.
Why Stretch Is So Hard in Gluten-Free Dough
If you’ve baked with wheat flour, you know gluten is what gives bread and pizza its elastic, chewy texture. Gluten acts like a net — trapping air bubbles and allowing the dough to stretch without tearing.
But when we go gluten-free, we lose that natural elasticity. Most gluten-free flours (like rice flour or tapioca starch) don’t have proteins that form stretchable strands. That’s why many gluten-free doughs are crumbly or fragile.
However, this doesn’t mean we can’t recreate that magic — we just need to build a new structure with other ingredients.
The Key Ingredients for Stretchy Gluten-Free Pizza Dough
Here’s where things get fun. Gluten-free baking isn’t about one miracle ingredient — it’s about combining the right textures and binders to mimic gluten’s behavior.
1. The Flour Blend
A perfect gluten-free flour mix usually includes:
- Brown rice flour – gives structure and a mild flavor.
- Tapioca starch – adds chew and flexibility.
- Potato starch – lightens the texture.
- Sorghum or millet flour – for that bready depth of flavor.
You can mix your own, or use a high-quality all-purpose gluten-free blend that includes xanthan gum or guar gum.
Tip: Brands like Bob’s Red Mill 1-to-1 and King Arthur Measure for Measure are great starting points.
2. The Binders (The Real Secret to Stretch)
Binders are what make the dough stretchy and cohesive instead of sandy or dry.
Some of the best options:
- Psyllium husk powder – creates an amazing gel when mixed with water, giving that gluten-like elasticity.
- Xanthan gum – helps hold the dough together and trap air bubbles.
- Chia or flaxseed gel – works well if you want a more natural alternative.
Pro tip: Psyllium husk + xanthan gum together make magic. They give you the “pull” that most gluten-free doughs miss.
3. The Liquids
Water is obvious, but the temperature and fat content matter too.
Use warm water (about 105°F / 40°C) to activate the yeast. Add olive oil for richness and tenderness — it also keeps the crust from drying out. A touch of honey or sugar helps the yeast rise more actively.
4. The Yeast and Rise
Gluten-free dough doesn’t need kneading like wheat dough, but resting time is still crucial. That’s when the binders fully hydrate and the yeast starts to work.
Give your dough at least 30–45 minutes to rest before shaping. This is when it transforms from sticky batter to something you can actually stretch.
The Perfect Stretchy Gluten-Free Pizza Dough Recipe
Ready to bake? Here’s a recipe that consistently delivers — chewy edges, flexible dough, and a golden, crisp bottom.
Ingredients
- 2 cups (250 g) gluten-free all-purpose flour (with xanthan gum)
- 2 tbsp psyllium husk powder
- 1 tsp salt
- 1 tbsp sugar or honey
- 2 tsp instant yeast
- 1 tbsp olive oil
- 1 ¼ cups (300 ml) warm water (around 105°F / 40°C)
- Optional: 1 tsp apple cider vinegar (adds lightness and flavor)
Step-by-Step Instructions
1. Activate the yeast
In a medium bowl, mix the warm water, sugar (or honey), and yeast. Let it sit for about 5–10 minutes, until it starts to foam on top. That’s how you know your yeast is alive and ready.
2. Mix the dry ingredients
In a large mixing bowl, combine your gluten-free flour, psyllium husk powder, and salt. Give it a quick whisk to distribute everything evenly.
3. Combine wet and dry
Pour the yeast mixture into the dry ingredients, add olive oil and vinegar, and stir with a spoon or spatula. The dough will look sticky at first — that’s good! Keep stirring for 2–3 minutes until it thickens into a soft, stretchy dough.
✋ If it feels too dry, add 1–2 tablespoons of warm water.
If too wet, sprinkle a little more flour until it holds together.
4. Let it rest
Cover the bowl with plastic wrap or a towel and let the dough rest in a warm place for 30–45 minutes. You’ll see it rise slightly — not as much as regular dough, but enough to become airy and pliable.
5. Shape it
Lightly oil your hands and parchment paper. Turn the dough out and press it into a pizza shape — about ¼ inch thick. You’ll notice it actually stretches! If it tears, just pinch it back together.
6. Pre-bake (optional but worth it)
Bake the plain crust at 425°F (220°C) for about 8 minutes before adding toppings. This keeps it sturdy and prevents sogginess.
7. Top and bake
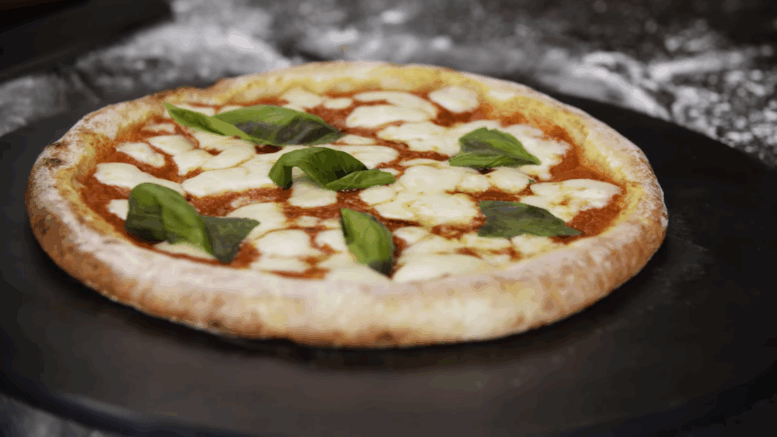
Add your favorite sauce, cheese, and toppings. Bake again for 12–15 minutes, or until the edges are golden and the center is bubbly.
Troubleshooting: When the Dough Misbehaves
Even experienced bakers hit a few snags. Here’s how to fix them.
❌ The dough is too sticky
Add a bit more flour — but only a tablespoon at a time. Gluten-free doughs are naturally tacky, so you want it just barely manageable.
❌ It won’t stretch at all
It likely needs more hydration or rest time. Psyllium husk takes a while to absorb water, so let it sit an extra 15–20 minutes.
❌ The crust is too dry or brittle
Next time, brush the edges with olive oil before baking or mix in a teaspoon of oil into the dough.
❌ It doesn’t rise
Your yeast may be old or the water was too hot. Always check yeast freshness — and remember, gluten-free doughs won’t double like regular ones. A small puff is all you need.
Tips for the Perfect Gluten-Free Pizza Night
Making great gluten-free pizza is about patience and play. Here are a few things we’ve learned after plenty of Friday-night experiments:
- Use a pizza stone or steel – it gives you that crisp, restaurant-style bottom.
- Don’t overload with toppings – gluten-free crusts can get soggy under heavy sauces or cheese.
- Let it cool for 5 minutes before slicing – this helps it firm up and hold together better.
- Store leftovers right – wrap in foil and reheat in the oven, never the microwave, for the best texture.
Our Favorite Variations
Once you’ve mastered the base, get creative:
- Add garlic powder and herbs to the dough for flavor.
- Use cassava flour instead of rice for a paleo-friendly version.
- Try sourdough starter for extra tang and complexity.
Final Thought
So there you have it — a stretchy, gluten-free pizza dough that actually lives up to its promise. It’s chewy, flexible, and golden — everything we love about real pizza, minus the gluten.
Sure, it takes a little experimenting, but that’s part of the joy. Each batch gets a little better, a little stretchier, a little more “just right.”
So let’s stop dreaming about gluten and start celebrating what we can do. Fire up that oven, grab your toppings, and enjoy a slice (or three) of your best homemade gluten-free pizza yet.
Enjoy your meal! 🍕
Can’t wait to hear how yours turned out — drop me a comment below!
Thanks for being here! If you enjoyed the recipe, don’t forget to share it with your friends.
And if you’re still hungry for more, take a look at our earlier recipes — you might just find your next favorite!
5 Bertello Pizza Oven Recipes That’ll Make You the Star of Pizza Night!
Crispy, Chewy, Gluten-Free: The Perfect Ooni Pizza Dough (UK Edition)!
Healthy Choice Cauliflower Pizza: The Guilt-Free Recipe That Actually Tastes Like Real Pizza!
Be the first to comment on The Best Stretchy Gluten-Free Pizza Dough (You Won’t Believe It’s Gluten-Free)